How to Put on a Phone Screen Protector: Easy Steps
Your phone is your trusty companion, facing the hustle and bustle of daily life right alongside you. But with every swipe and tap, it becomes more vulnerable to scratches and smudges.
Imagine the frustration of seeing a scratch right in the middle of your screen. It’s not just annoying—it can affect the way you use your phone. That’s where a screen protector steps in, acting as a shield against the inevitable wear and tear.
But putting one on can seem daunting, right? You might worry about bubbles, misalignment, or even ruining your brand-new protector. Don’t worry, though. You’ll discover simple steps to apply a screen protector perfectly. Let’s dive into how you can safeguard your phone’s screen without the hassle.

Credit: www.linkedin.com
Choosing The Right Screen Protector
Screen protectors come in different types. Tempered glass protectors are popular. They are strong and offer good protection. Plastic film protectors are cheaper but may scratch easily. Privacy screen protectors keep your screen private. Nobody can see your screen from the side. Anti-glare protectors reduce glare. Useful for bright places.
Not all protectors fit every device. Check your phone model first. Make sure the protector matches. Some phones have curved screens. Not all protectors fit these. Edge-to-edge protectors cover the whole screen. Check for cutouts in the protector. These are important for cameras and sensors. Custom-made protectors fit perfectly. They are made for specific models.
Gathering Necessary Tools
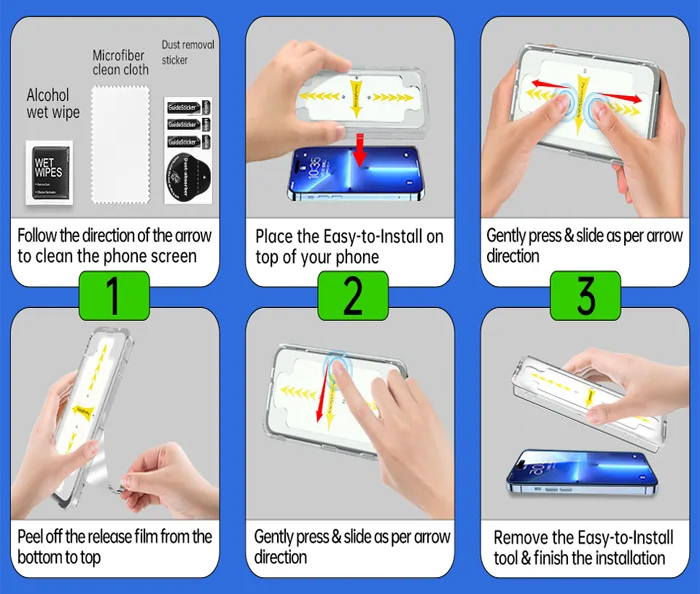
Clean your phone screen first. Use a microfiber cloth. It helps remove dust. Have some rubbing alcoholready. It helps clean sticky spots. Use a small spray bottle. Spray the cloth, not the screen. It keeps your phone safe. A dust removal stickeris handy. It catches tiny dust bits. Tiny bits are hard to see. But they can cause bubbles.
Gather the right tools. A screen protectorkit is needed. It often includes an application card. The card helps press the protector flat. It removes air bubbles. Some kits come with a guide frame. It helps align the protector. Make sure to have these tools. They make the job easier.
Preparing Your Phone
Start by turning off your phone. This helps you see dirt better. Use a soft microfiber cloth to gently wipe the screen. Make sure it is dry and clean. If needed, use a small amount of screen cleaner. Avoid using too much liquid. Wipe in a circular motion to avoid streaks. Do not forget the corners. They often collect dust.
Find a clean place to work. A room with closed windows is best. Dust can settle on the screen fast. Do not use a fan or open a window. These can blow dust around. Wash your hands before you start. This removes any oils or dirt. Keep your tools ready. You will need the screen protector and a dust remover sticker.

Credit: www.youtube.com
Aligning The Screen Protector
Always check if the screen protector fits well. Hold it over your phone. Look for the right size and shape. Check if it matches the screen’s edges. Ensure there are no gaps. A good fit keeps your phone safe. A poor fit might leave parts unprotected. Double-check before you stick it down.
Start by cleaning the screen. Use a soft cloth. Place the screen protector above the phone. Align it with the top edge. Make sure it’s straight. Lower it slowly. Press gently to avoid air bubbles. Once in place, smooth it out. Start from the center. Move to the edges. This ensures it sticks well.
Applying The Screen Protector
Start by cleaning your phone’s screen. This step is very important. Any dust can cause bubbles. Take yourtime with this step. Check the protector for any marks. Carefully peel the backing off. Hold the protector by its edges. Do not touch the sticky side. This keeps it clean.
Align the protector with the screen. Make sure it fits perfectly. Slowly lower it onto the screen. Use a card to push out bubbles. Start from the center. Work towards the edges. Press firmly to secure the protector. Double-check for any leftover bubbles. Enjoy your clean screen!
Removing Air Bubbles
Air bubblescan make your screen look bad. Use a card or tool to fix this. Start at the center of the screen. Press the card flat against the protector. Slowly push the card to the edges. This will move the air out.
Work carefully. Don’t rush. If you press too hard, the screen may crack. Hold the card steady. Use even pressure. Check the screen often. Make sure no bubbles are left. If bubbles stay, try again. Move the card back to the center. Then push again to the edges.
Using a cardis easy. Many people use a credit card. But any plastic card can work. Pick a card that is smooth. No rough edges. Smooth cards work best. They won’t scratch the protector.
Final Checks
Ensuring Proper Adhesionis important. The protector should stick flat on the screen. Press gently on all edges. This helps it stick better. Look for any air bubbles. Push them out slowly. Use a card or cloth. Air bubbles can make the screen look bad.
Checking for Imperfectionsis crucial. Look closely at the protector. Check for dust or fingerprints. These can cause problems. Wipe them away with a clean cloth. Make sure the screen is smooth and clear. Any bumps or marks can affect visibility. A smooth protector makes the screen look nice.
Credit: www.mobilephoneguard.com
Maintenance Tips
Keeping your phone screen protector clean is crucial. Use a soft, damp cloth to gently wipe the surface. Avoid harsh cleaners that can damage the protector. If dirt is stubborn, try using a mild soap. Ensure no water goes inside your phone. Be careful and gentle while cleaning.
Inspect the screen protector regularly for scratches or cracks. A damaged protector can affect your phone’s display. Replace it when you notice wear and tear. It’s easy to put on a new one. Just peel off the old protector and stick on a new one. Make sure it fits properly. This keeps your phone safe and looking new.
Frequently Asked Questions
How Do I Clean The Screen Before Applying?
To clean your screen, use a microfiber cloth to remove dust. Then, apply a small amount of isopropyl alcohol on the cloth. Gently wipe the screen to remove fingerprints and smudges. Ensure the screen is completely dry before applying the protector to avoid bubbles.
Can I Reposition A Screen Protector After Applying?
Yes, you can reposition the screen protector immediately after applying it. Lift the protector gently from the corner, align it properly, and reapply. Ensure the screen is dust-free before repositioning. Doing this quickly helps prevent dust from settling on the screen, which can cause bubbles.
What If Bubbles Appear Under The Protector?
If bubbles appear, use a credit card to smooth them out. Start from the center and push towards the edges. If the bubbles persist, lift the protector slightly and reapply. Ensure the screen is clean and dust-free before reapplying to avoid trapped air.
Do All Phones Need Screen Protectors?
Not all phones require screen protectors, but they offer extra protection. Screen protectors safeguard against scratches, smudges, and minor impacts. If your phone is often in your pocket with keys or coins, a protector is advisable. It’s a cost-effective way to maintain your phone’s screen quality.
Conclusion
Putting on a phone screen protector is simple with practice. Clean the screen well. Align the protector carefully. Remove any air bubbles. Take your time. Patience is key. A well-placed protector keeps your phone safe. It guards against scratches and smudges.
Repeat steps if needed. Practice makes perfect. Enjoy a clean, clear screen. Now your phone is protected. Feel confident using it daily. Remember, protectors last longer with care. Replace them if damaged. It’s an easy way to extend phone life.
Happy protecting!

Marlowe Quinn is a technology writer at ElectroDoz, with expertise in smartphones, chargers, power banks, phone cases, selfie sticks, and other mobile accessories. Known for breaking down specs and features into easy-to-understand insights, Marlowe helps readers find the right gadgets to stay connected and powered up in their daily lives.