How to Turn a Macbook Air on: Quick Start Guide
Are you staring at your sleek MacBook Air, eager to dive into its world of possibilities, but unsure how to even turn it on? You’re not alone.
This minimalist marvel can be a bit mysterious at first glance. But don’t worry, you’re in the right place. In this guide, we’ll walk you through the simple steps to power up your MacBook Air. Imagine the satisfaction of confidently pressing that button and watching your screen come to life, ready to help you tackle your tasks, projects, or entertainment.
By the end of this article, you’ll not only know how to turn it on, but you’ll also feel empowered to explore everything your MacBook Air has to offer. So, let’s get started, shall we? Your digital adventure awaits.

Credit: www.youtube.com
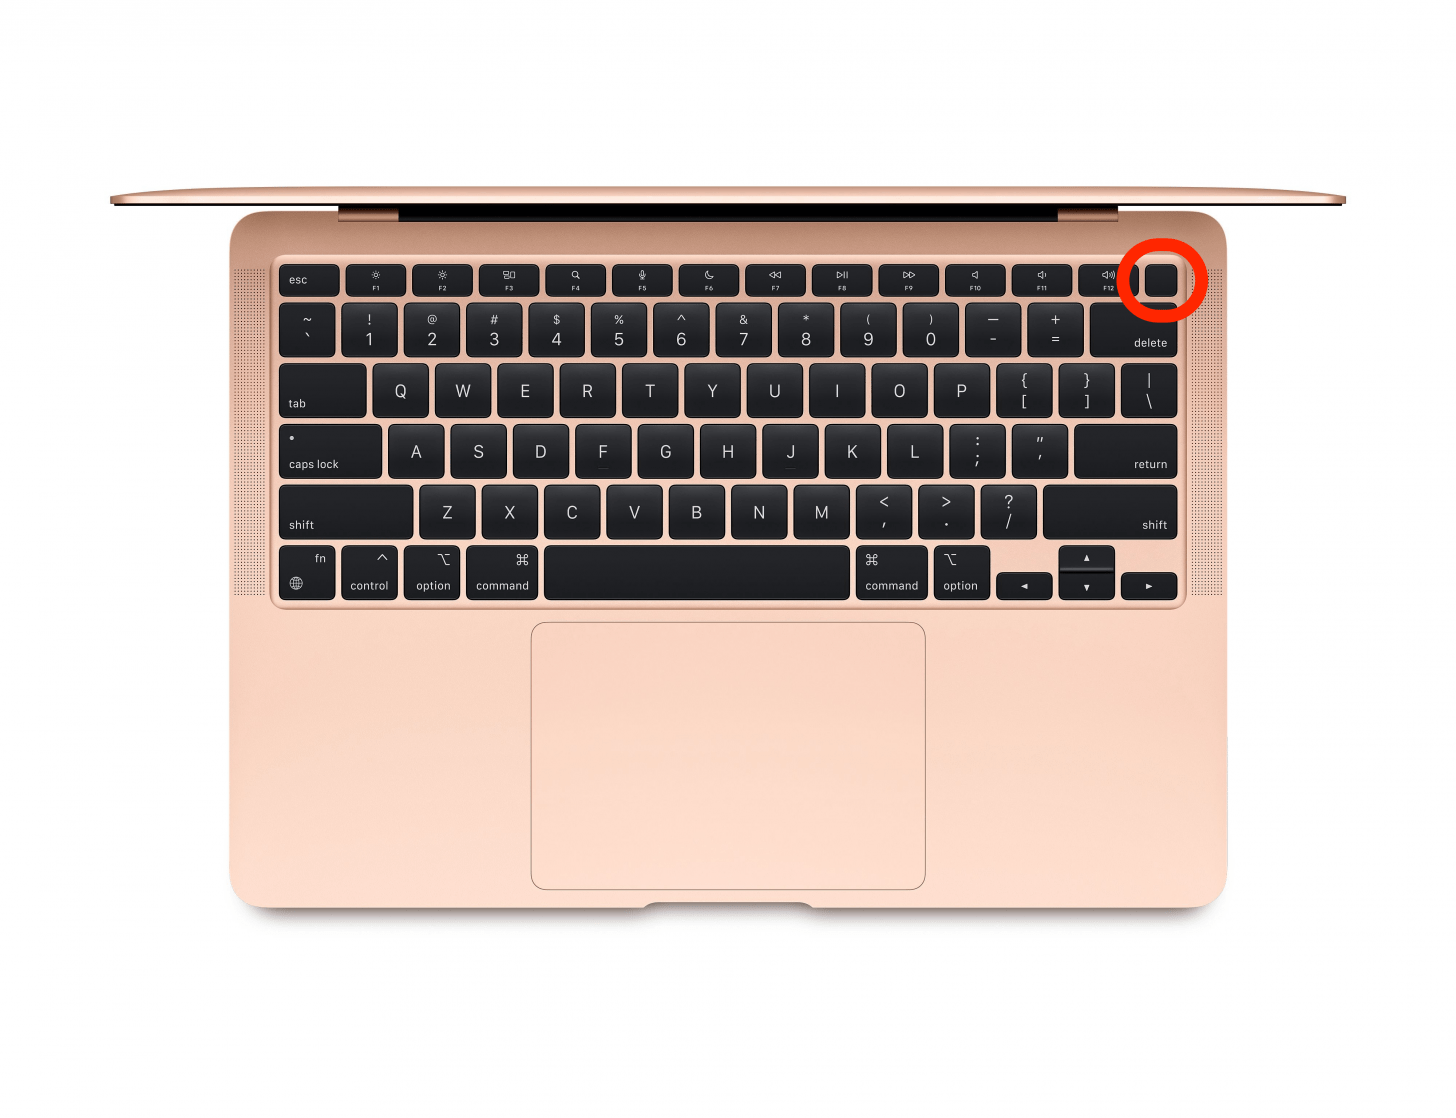
Power Button Location
The power buttonis on the top right corner. It is part of the keyboard. It looks like a small circle. Press it gently to turn on the laptop.
Some Macbook Air models have the button as part of the Touch ID. It serves two purposes. It unlocks your laptop and also turns it on. The button is easy to find and press.
If unsure, look for a small circle or rectangle. It is not hard to miss. The button is important for starting the laptop.
Connecting The Charger
Plug the charger into your Macbook Air. Check the plug for a tight fit. A loose connection won’t charge your laptop. Ensure the wall socket is switched on. The charger light should glow. Green means charged. Amber means charging. If the light is off, check your connections. Sometimes, wall sockets may be faulty. Try another socket if needed.
Never use a damaged charger. It can harm your Macbook. Always use the original charger. Other chargers may not work well. They might damage your device. Keep chargers away from water. Water can cause electrical hazards. Make sure your charger is in good condition.
Pressing The Power Button
Find the power button on your MacBook Air. It’s usually at the top right corner. Press the button gently. Hold it for a few seconds. The screen will light up when it’s on. Listen for the startup chime. This means your MacBook is starting. Look for the Apple logo on the screen. That shows it’s working. If nothing happens, check the battery. Make sure it’s charged. Plug it in if needed. Wait a few moments. Try again if necessary.
Credit: www.iphonelife.com
First Boot Setup
Choose your preferred language from the list. This will set your Macbook’s primary language. Ensure the chosen language is easy for you to understand.
Find your Wi-Fi network name. Enter the password to connect. Make sure the connection is stable. This helps in loading settings faster.
Enter your Apple ID and password. This links your Macbook to your Apple account. It allows access to the App Store and iCloud.
Using The Trackpad
The trackpad is a smooth surface. It helps you control the cursor. Place your finger gently on the trackpad. Move it around to see the cursor move. Tapto click on things. Double-tapfor extra actions. You can also scrollusing two fingers. Slide them up or down to scroll.
The trackpad allows zooming. Pinch with two fingers to zoom in or out. Rotateimages by twisting two fingers. Trackpad gestures are simple. Practice to get better. Remember, light touch is best.
Keyboard Shortcuts
MacBook Air users can use keyboard shortcuts to perform tasks quickly. Pressing the power button on the keyboard will turn the laptop on. This button is usually at the top-right corner. If the MacBook doesn’t turn on, hold the power button for a few seconds. This can help start the computer when it seems stuck.
Another useful shortcut is Command + Control + Power. This can restart the MacBook Air without using the menu. It’s handy if the computer is frozen. Remember, using keyboard shortcuts can save time and make tasks easier. Practice using these shortcuts to become more familiar with them.
Screen Brightness Adjustment
Adjusting the screen brightnesson a MacBook Air is simple. Find the F1 and F2 keyson the top row of your keyboard. The key with a sun symbol and a down arrow is F1. This lowers brightness. The key with a sun symbol and an up arrow is F2. This raises brightness.
Pressing F1 will make the screen dimmer. Pressing F2 will make it brighter. Try pressing these keys to find the best brightness for your eyes. Brightness helps you see the screen clearly. It is important to adjust it for comfort. Too bright can hurt your eyes.
Volume Control
Press the volume keys on the keyboard. The volume upkey looks like a loudspeaker with sound waves. The volume downkey is a loudspeaker with fewer sound waves. Each press will increase or decrease the sound.
Use the mute key to silence sound. The mute keyhas a loudspeaker with a line through it. Pressing it will turn off all sound. To unmute, press it again.
Open System Preferences for more settings. Click the sound iconto adjust volume levels. Drag the slider to change the volume. This is useful for fine adjustments.
Connecting To Wi-fi
First, find the Wi-Fi icon at the top-right of your screen. Click on it. A list of Wi-Fi networks will show. Choose your Wi-Fi network from the list. Enter the password if it asks for one. Make sure to type the password correctly. Click on the “Join” button.
Your MacBook Air will try to connect. Wait a few seconds. If everything is correct, you will connect to the Wi-Fi. The Wi-Fi icon will look full. This means you are connected. Now, you can browse the internet.

Credit: www.youtube.com
Battery Management Tips
Keep your Macbook Air battery in good shape. Avoid letting it go to zero percent. Charge it before it gets too low. A full charge is not always needed.
Unplugwhen the battery is around 80%. This helps the battery last longer. Use the Macbook while it is plugged in sometimes. It will help the battery stay strong.
Do not keep your laptop on charge all the time. Give it a break from charging. Let it rest. This is good for your laptop’s health.
Try not to use your laptop in extreme cold or heat. These conditions can hurt the battery. Keep your Macbook Air in a safe temperature.
Frequently Asked Questions
How Do I Turn On A Macbook Air?
To turn on your MacBook Air, simply press the power button located on the top-right corner of the keyboard. If your device doesn’t start, ensure it’s charged and connected to power. A brief press should initiate the startup process, and the screen will light up shortly after.
Can I Use The Keyboard To Power Up?
Yes, you can use the keyboard to power up if the MacBook Air is in sleep mode. Press any key to wake the device from sleep. However, if the device is completely off, you must use the power button to turn it on.
What If My Macbook Air Won’t Turn On?
If your MacBook Air doesn’t turn on, check the power connection and ensure the device is charged. Try resetting the SMC (System Management Controller) by following Apple’s instructions. If the issue persists, contact Apple Support for further assistance and troubleshooting.
Do Macbook Airs Have A Dedicated Power Button?
Yes, MacBook Airs have a dedicated power button. It’s located at the top-right corner of the keyboard, doubling as the Touch ID button in newer models. This button is used to power on, shut down, or restart the device, providing easy access for users.
Conclusion
Turning on your MacBook Air is simple and quick. Just press the power button. Wait for the Apple logo to appear. Your device starts up smoothly. Follow the steps shared here for guidance. Remember, keep your MacBook charged. A low battery can cause startup issues.
Regularly update your software for the best performance. Now, you’re ready to use your MacBook Air. Enjoy exploring its features. Have fun discovering new possibilities. Keep learning and growing with your device. Feel free to explore more resources online.

Finnian Delaney is a seasoned writer and editor specializing in technology and electronics. At ElectroDoz, he covers a wide range of topics, with a focus on MacBooks, laptops, fitness trackers, keyboards, and computer hardware. With a knack for making complex tech accessible, Finnian helps readers stay informed and confident when choosing their next device or upgrade.