How to Create a Projector at Home: DIY Guide
Imagine turning your living room into a mini movie theater without spending a fortune. Sounds exciting, right?
If you’ve ever dreamed of watching your favorite films on a big screen from the comfort of your home, you’re in the right place. Creating a projector at home might sound like a complicated task, but with the right guidance, it’s simpler than you think.
This guide is designed just for you, to walk you through each step, ensuring you understand every part of the process. By the end, you’ll not only have a projector but also a sense of accomplishment. Ready to impress your friends and family with your DIY skills? Let’s dive into the world of homemade projectors and transform your viewing experience!
Credit: www.youtube.com
Materials Needed
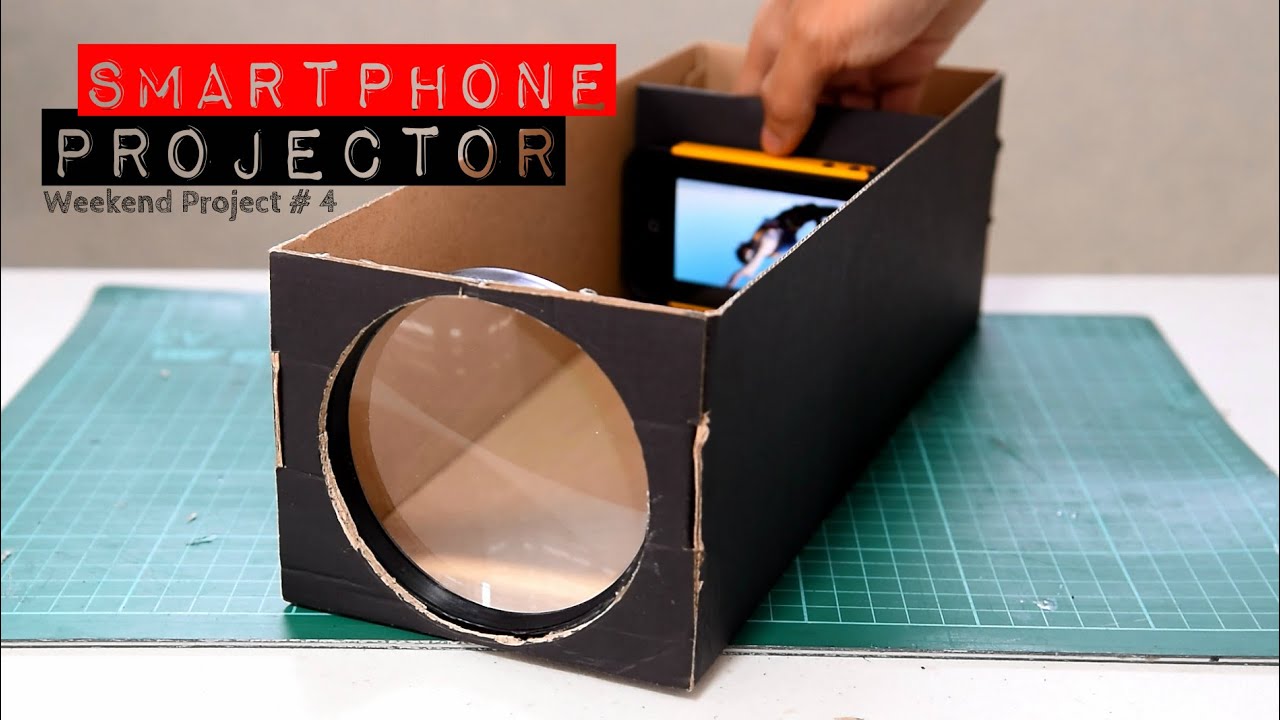
Start by collecting basic materials. You need a magnifying glass. Find a smartphone. Grab some tape and a scissors. You will also need a shoe box.
Choose a lens carefully. A magnifying glass works well. Make sure it is large. The lens focuses the light. Get a clear lens for best results.
Pick a box that fits your needs. A shoe box is ideal. It should be sturdy. The box holds the lens and smartphone. Make sure it is big enough.
Step-by-step Assembly
Start with a shoe box. It should be strong. Cut a small hole in one side. The hole must fit the lens. Use a ruler for straight lines. Make sure the box is clean. Remove any stickers or labels. This helps light pass through.
Choose a magnifying glass. It will act as the lens. Insert the lens into the hole. Secure it with tape or glue. Make sure it does not move. The lens should be centered. This ensures a clear picture. Adjust until it looks right.
Use a small flashlight. Place it inside the box. It should point to the lens. The light must be bright. It helps to see the image. Try different positions. See what works best. Be careful not to block the light.
Adjusting The Image
Focusing the lensis crucial for a clear picture. Turn the lens until the image becomes sharp. It may take a few tries. Adjust slowly for better results. If the image is still blurry, check the distance. Move the projector closer or further. Keep the lens clean too.
Positioning the projectoraffects the image size. Place the projector at the right height. Tilt it slightly if needed. Use a stand for stability. Make sure it’s centered with the screen. This helps the image stay straight. Avoid placing it too high or low. Adjust until the image fits the screen well.
Enhancing brightnessmakes the image more vivid. Use a dark room for better brightness. Increase the brightness settings on the projector. Check the bulb; it should be bright. Cover windows to block light. Use white or light-colored walls. This will reflect more light.

Credit: www.tiktok.com
Testing And Troubleshooting
Creating a projector at home involves simple steps and requires testing and troubleshooting. Start by assembling basic materials like a magnifying glass and a cardboard box. Troubleshoot common issues such as blurry images by adjusting the focus and position of the light source.
Checking Image Quality
Adjust the focus for sharp images. Ensure the lens is clean. Dirt can blur the picture. Distance between projector and wall matters. The right distance improves clarity. Use a white wall or screen. Dark surfaces reduce image quality.
Fixing Common Issues
Check the connections first. Loose wires can cause problems. Reboot the projector if it freezes. Try a different power source if it won’t turn on. Adjust the settings if colors look strange. Incorrect color settings can affect the display.
Improving Resolution
Choose a high-quality lens for better resolution. Use a higher resolution source. This helps in displaying clearer images. Adjust the projector settings for optimal resolution. Lower brightness settings can improve clarity.
Creative Enhancements
Crafting a projector at home is a fun and educational activity. Use simple materials like a shoebox, magnifying glass, and smartphone to project images. This creative project enhances understanding of light and magnification.
Adding A Stand
Creating a stand for your projector is fun. Use cardboard or wood for the base. Make sure it’s stable. A stable stand keeps the picture clear. You can paint it bright colors. Bright colors make it look nice. Place the projector on a table or shelf. Ensure the height matches the screen level. This helps the image stay centered.
Incorporating Sound
Sound makes the movie experience better. Use small speakers for clear sound. Connect them to the projector. Place speakers on each side. This creates a surround sound effect. Test the volume. Ensure it’s not too loud or quiet. Adjust the settings for best audio quality. Good sound makes watching movies more fun.
Customizing The Design
Personalize your projector design. Use stickers or decals for style. Add lights for a cool look. Lights make the projector stand out. Choose colors that you love. Match them with your room decor. Customize it to fit your taste. A unique design makes your projector special.

Credit: awolvision.com
Frequently Asked Questions
How Can I Make A Simple Projector At Home?
To make a simple projector at home, you’ll need a magnifying glass, a cardboard box, and a smartphone. Cut a hole in the box to fit the magnifying glass, place your phone inside, and project images onto a wall. Adjust the focus by moving the phone back and forth.
What Materials Are Needed For A Diy Projector?
For a DIY projector, you’ll need a magnifying glass, cardboard box, smartphone, and black paint. The magnifying glass will act as the lens, while the box holds everything together. Paint the interior black to improve image quality. A smartphone will provide the content you want to project.
Can I Use A Smartphone As A Projector?
Yes, you can use a smartphone as a projector with a DIY setup. Place your phone inside a box with a magnifying glass. The magnifying glass focuses the phone’s screen projection onto a wall. This method is cost-effective and easy to assemble, offering a basic projection experience.
What Is The Cost Of Making A Home Projector?
The cost of making a home projector is minimal, often under $20. You need items like a magnifying glass, cardboard box, and basic tools. Most materials can be found at home or bought cheaply. This DIY approach is budget-friendly and accessible for most people.
Conclusion
Creating a homemade projector can be a fun project. You learn while enjoying the process. Gather simple materials like a magnifying glass and cardboard. Follow the steps to assemble them. Test your projector in a dark room. Adjust the setup for better image quality.
Share your project with family and friends. They will be impressed with your creativity. Experiment with different designs to improve your projector. Remember, patience is key to success. Your homemade projector can enhance movie nights. Enjoy the experience of DIY.
Have fun projecting and learning.

Everett Ashford is an electrical engineer and expert in electronics reviews, tips, and troubleshooting. Specializing in audio and sound devices, including earbuds, AirPods, and headphones, he brings in-depth knowledge and practical advice to help consumers make informed decisions.