How to Remove Fitbit Band: A Step-by-Step Guide
Are you struggling with removing your Fitbit band? You’re not alone.
Many users find this simple task surprisingly tricky. Whether you’re looking to switch to a new band for a fresh look or need to clean your current one, mastering the removal process is essential. In this guide, you’ll discover the easiest way to remove your Fitbit band without any hassle.
Imagine the satisfaction of effortlessly swapping bands and customizing your Fitbit to match your style or activity. Keep reading, and you’ll gain the confidence to change your band like a pro, ensuring your Fitbit always complements your lifestyle.
Tools Needed
To remove the Fitbit band, gather a few simple tools. You will need a small screwdriver. A flathead is best. Also, have a soft clothready. The cloth keeps your Fitbit safe from scratches. A clean workspaceis important too. It helps keep tiny screws in sight. Make sure the area is well-lit. Good lighting helps you see better. This makes the process easier. Have a small containernearby. It can hold the screws. This way, you won’t lose them. Being careful is key. Take your time. Enjoy the process!
:max_bytes(150000):strip_icc()/LocatingtheFitbitVersapins-73330d5b8fb44374b148687ee7f74f5f.png)
Credit: www.thalinepal.com
Safety Precautions
Removing a Fitbit band is easy. Stay safe while doing it. Always handle the band gently. This prevents breaking it. Ensure your hands are clean and dry. Wet hands can slip. Avoid sharp tools near the band. They might scratch the screen. Check for any loose parts first. Tighten them before removing. Hold the band firmly. Pull it out slowly. If it feels stuck, do not force it. Stop and check why. Sometimes, dust can make it hard. Clean the area gently. Use a soft cloth. Once clean, try again. Be patient and careful. Your Fitbit will stay safe.
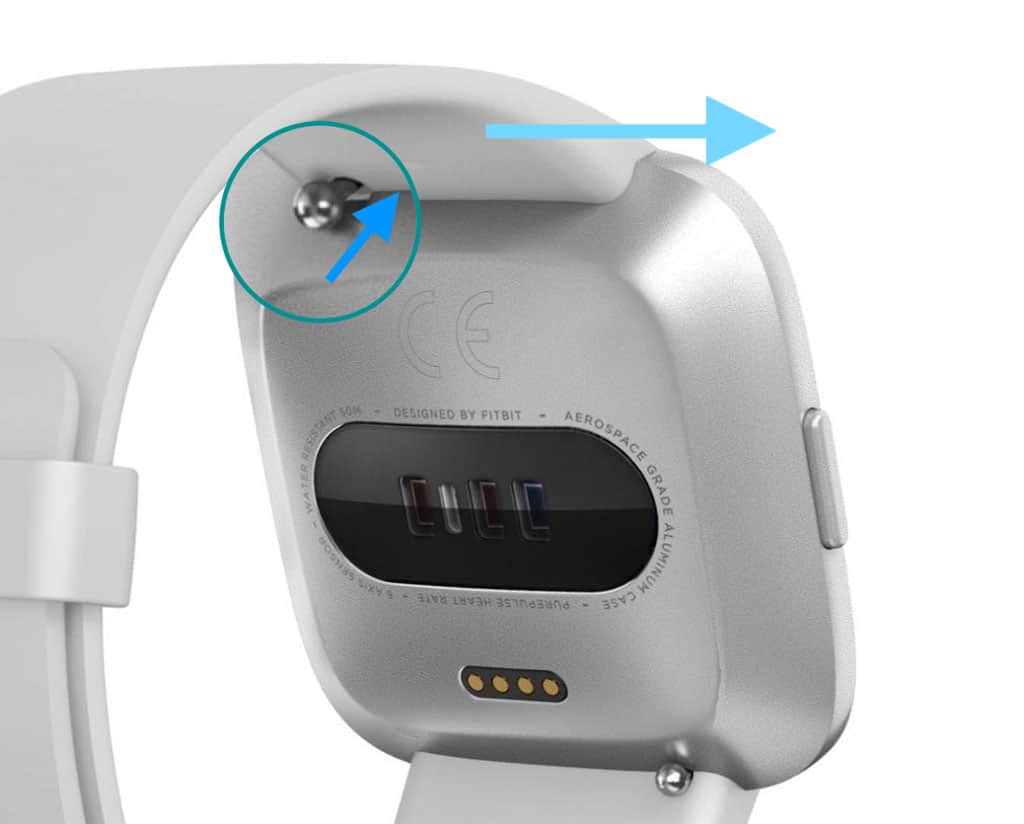
Locating The Band Release
The band releaseis near the watch face. It’s small and hard to find. Look for a tiny button or lever. It’s on the back side of the watch.
Press the button or pull the lever. The band will loosen. It’s simple but requires care. Hold the watch steady. Avoid forcing the band.
Once loose, gently slide the band off. Keep it safe. You can now change or clean it. Always check for dirt or damage. Fix problems before wearing again.
Releasing The Band
Find the latch on the back of your Fitbit. Use your thumb to press the latch firmly. The latch holds the band in place. You need to press it to release the band. Make sure you press it straight down. This helps in removing the band easily.
After pressing the latch, gently slide the band out. Hold your Fitbit steady with one hand. Use the other hand to slide the band away. Move it slowly to avoid any damage. Sliding the band is smooth if done correctly. Do not force it out. If it is stuck, check the latch again. Sometimes it needs another press.
Cleaning The Band Area
Use a soft, dry cloth to gently wipe your Fitbit band. This helps in removing any visible dust and debris. Make sure to clean the corners and edges carefully. A soft brush can also help in cleaning the hard-to-reach areas. Be gentle while brushing. Avoid using sharp objects, as they can scratch the band.
A mild soap solution can clean more stubborn dirt. Mix a small amount of soap with water. Dip the cloth in the solution, then wring it out. Wipe the band gently to remove any dirt or stains. Make sure to rinse the cloth and wipe the band again to remove soap. Let the band dry completely before wearing it again.
Credit: greensafaris.com
Installing A New Band
Hold the new band next to the Fitbit watch. Make sure the pins align properly with the grooves. The band should fit snugly. It should not be loose. Check the fit from both sides. Each side must click into place. A slight push may be needed. Hear a click for a proper fit. Check alignment one more time.
Push the band firmly into the slot. Ensure it is locked securely. Pull the band gently to test. It should not come out easily. If it feels loose, try again. Listen for the click sound. This sound means it’s locked. Always ensure a tight fit. A secure band means better comfort.
Testing The New Band
Removing a Fitbit band is straightforward. Start by locating the latches on the band. Gently press the release buttons to detach the band from the tracker.
Checking For Secure Fit
Always make sure the band fits securely. A loose band can fall off. It should not be too tight. Tight bands can hurt your skin. Adjust the band to find the best fit. Wear it for a while. This helps check if it stays on well.
Ensuring Comfort
Comfort is very important. The band should feel nice on your wrist. It must not cause any itchiness. Try moving your wrist. The band should not dig into your skin. Adjust as needed for the best feel. Comfortable bands help you wear your Fitbit all day.

Credit: www.youtube.com
Troubleshooting Common Issues
Removing a Fitbit band can be easy. First, identify the small metal clasp on the band. Press gently to release it. Slide the band off the device. Repeat on the other side. Always handle with care to avoid damage.
Band Doesn’t Release
Many people struggle when the Fitbit band doesn’t release. Ensure you press the release button firmly. Sometimes, dirt or debris blocks the release. Clean the area gently with a soft cloth. If it still won’t release, check for damage. Broken parts can cause problems. Consider contacting Fitbit support for help.
New Band Isn’t Secure
Having trouble with a loose band? Check the fit of the new band. It should click into place. If not, the band might be defective. Some bands need a tight push to secure. If the band seems fine but still loose, try adjusting the strap. Ensure it’s tight enough around your wrist. A secure fit ensures accuracy in readings. Always check for wear and tear.
Frequently Asked Questions
How Do I Remove The Fitbit Band?
To remove the Fitbit band, turn the device over. Press the quick-release lever inward, gently pull the band away from the tracker. Repeat on the other side. Ensure you handle the device carefully to avoid damage. The process is quick, taking only a few seconds per side.
Can I Change My Fitbit Band Myself?
Yes, you can change your Fitbit band yourself. The process is simple and doesn’t require any tools. Just use the quick-release levers on the back of the device. This allows you to easily swap bands for different styles or activities.
What Should I Do If The Band Is Stuck?
If your Fitbit band is stuck, try using a small tool like a toothpick. Carefully push the quick-release lever inward. Wiggle the band gently to loosen it. If it remains stuck, consult Fitbit’s support or a professional to avoid damaging your device.
Are All Fitbit Bands Interchangeable?
Not all Fitbit bands are interchangeable. Compatibility depends on the specific model you own. Always check the band’s compatibility with your Fitbit model before purchasing. Using an incompatible band may cause discomfort or damage to your device.
Conclusion
Removing a Fitbit band is simple and quick. Just follow the steps. Ensure you handle the band gently to avoid damage. Keep your Fitbit clean and well-maintained for longer use. A loose or worn band might need replacing. Regular care ensures comfort and functionality.
Always check compatibility when buying a new band. This keeps your device secure. Enjoy your Fitbit with ease and confidence. Remember, a well-fitted band enhances your experience. Happy tracking!

Finnian Delaney is a seasoned writer and editor specializing in technology and electronics. At ElectroDoz, he covers a wide range of topics, with a focus on MacBooks, laptops, fitness trackers, keyboards, and computer hardware. With a knack for making complex tech accessible, Finnian helps readers stay informed and confident when choosing their next device or upgrade.