How to Make a Holographic Projector at Home: DIY Magic
Imagine turning your smartphone into a mesmerizing holographic display, right in your living room. Sounds like science fiction, doesn’t it?
Yet, with just a few household items and a dash of creativity, you can create your own holographic projector at home. This isn’t just a fun DIY project; it’s an opportunity to wow your friends and family with a futuristic spectacle.
Are you ready to dive into the world of holography and bring your screens to life? In this guide, you’ll discover step-by-step instructions that are so simple, anyone can follow them. Let’s unlock the magic of holograms together and turn your home into a portal to another dimension. Keep reading to learn how to captivate with your very own holographic masterpiece!
Materials Needed
Gather a pair of scissorsand a ruler. You will also need a clear CD caseand a marker. These tools help in cutting and measuring. Make sure you have a steady hand.
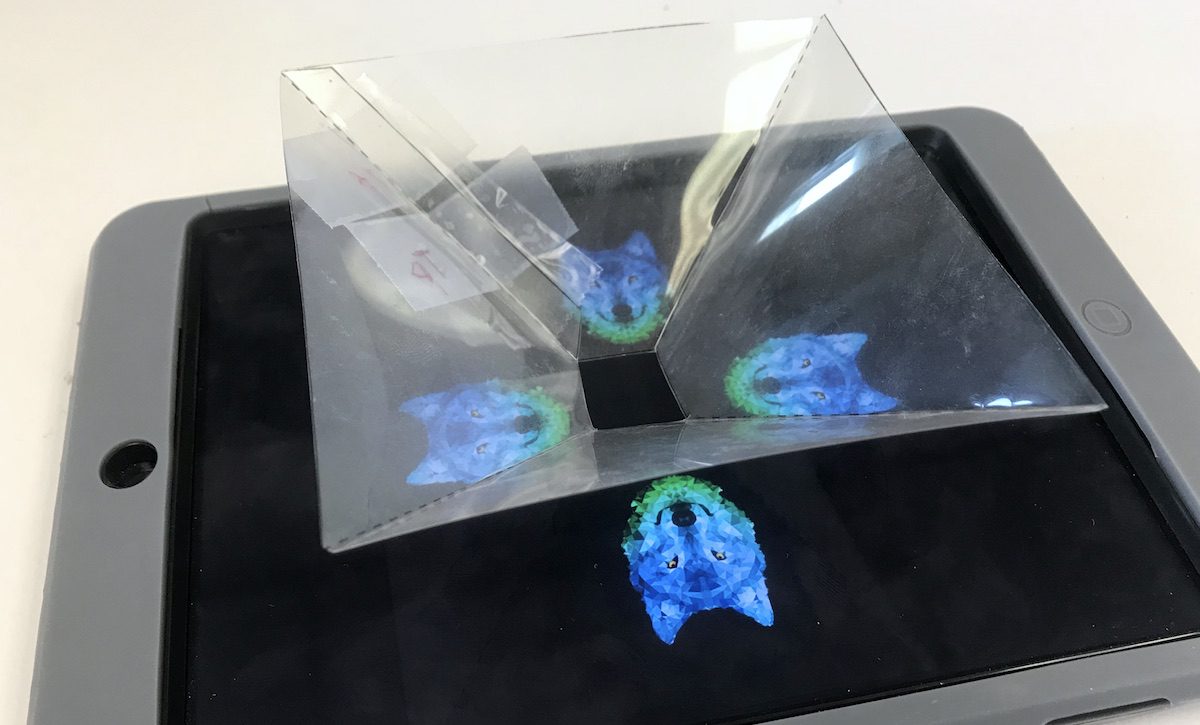
A smartphoneis needed for the display. This acts as the screen for your projector. You also need transparent plastic sheets. These sheets form the holographic lens. Cut them into small triangles. Tape them together to make a pyramid shape. This pyramid will sit on your phone.
Preparing The Work Area
Ensure the work area is clean and well-lit. Avoid clutter to prevent trips. Keep sharp objects away from edges. Wear gloves if handling sharp tools. Protect your eyes with goggles. Ensure no flammable materials are nearby. Work in a space with good air flow.
Gather all materials before starting. You need plastic sheets, scissors, and tape. Also, a ruler and smartphone are important. Keep all items in one place. Use a container for small parts. Check you have everything before you start. This saves time and keeps you organized.
Creating The Projector Lens
Crafting a holographic projector lens at home involves simple materials and steps. Start by cutting a transparent plastic sheet into triangular shapes. Assemble them into a pyramid, and place it on your smartphone screen to project 3D images effectively.
Selecting The Right Plastic
Choose clear plastic sheets. They must be thinand flexible. This helps light pass through. Look for transparencyand durability. Check the edges for smoothness. Sharp edges can be harmful.
Cutting The Template
Draw a trapezoidshape on the plastic. Use a ruler for straight lines. Cut with scissors carefully. Ensure all sides are equal. This gives a perfect shape. Repeat four times for each lens.
Assembling The Lens
Place the trapezoids together. Form a pyramid shape. Use tape to fix them. Ensure they stand upright. Check the angles. The lens should be stableand even. Test it with a light source.
Credit: theartofeducation.edu
Building The Projector Base
Picking the right base is key. Sturdy materials like cardboard or plastic work well. Cardboard is easy to cut. Plastic is strong. Use what you have at home. Make sure the base is flat. This helps the projector stay stable. Size matters too. The base should be wide enough for your projector. Use a ruler to measure before cutting.
Cut the base carefully. Use scissors or a cutter. Safety first. Ask an adult for help if needed. Glue the pieces together. Use strong glue. Let the glue dry for a few hours. Check if the base is firm. It should not wobble. Test it. Put a small object on it. See if it holds well. If it does, your base is ready.
Assembling The Holographic Projector
Crafting a holographic projector at home involves basic materials like glass and smartphone. Start by cutting glass into small strips. Arrange them to form a pyramid shape. Place the pyramid on the phone screen, and enjoy the holographic display.
Attaching The Lens
First, find a small plastic lens. It can be from a toy or an old magnifying glass. Make sure it’s clean and clear. Place the lens on a flat surface. Use some clear tape to hold it steady. This will help the projector work well. You might need help from an adult to do this.
Positioning The Base
Now, let’s work on the base. Get a piece of cardboard. Make sure it’s strong and flat. Cut it into a square shape. The size should match your lens size. Place the lens on the cardboard. Adjust it so it’s right in the center. Secure it with more tape. This keeps the lens in the right place.
Credit: www.youtube.com
Testing The Projector
Selecting holographic contentis the first step. Choose videos with bright colors. Simple shapes work well. Find content that moves slowly. This makes it easier to see.
Next, play the content on your device. Make sure the screen is clean. Dust can blur the image. Place the projector at the center of your screen. Turn off the lights for better viewing.
Adjusting for optimal viewingis important. Move the projector closer or farther from the screen. This changes the image size. Tilt the projector slightly. This helps with focus. Try different angles to see what looks best.
Check the room’s light. Too much light can ruin the effect. A dark room works best. Sit at the right distance. Too close or too far won’t look good. Enjoy watching your hologram!
Enhancing The Experience
Creating a holographic projector at home can transform your viewing experience. Simple materials like plastic sheets and a smartphone can bring images to life. This DIY project offers a fun and educational way to explore holography.
Improving Image Quality
Use a clear plastic sheet for better images. Clean the sheet well before using. Ensure your device screen is bright. A brighter screen means a clearer image. Adjust the room lighting. A dark room works best. Avoid any reflections on the screen. This helps in getting a sharp image.
Adding Sound Effects
Connect speakers to your device. This makes the experience more fun. Choose sounds that match the image. Nature sounds work well for animals. Use music for dance or party scenes. Ensure the volume is not too loud. It should be just right.

Credit: www.instructables.com
Troubleshooting Common Issues
Creating a holographic projector at home can be exciting, but sometimes issues arise. Ensure all materials are correctly aligned. Check light sources and angles for optimal projection clarity.
Blurry Images
Blurry images can make your holographic projector feel broken. Check the lens of your projector. It may have dust or dirt. Clean it gently. Use a soft cloth. Also, adjust the focus knob. Turn it slowly. See if the image gets clearer. Another tip: ensure your light source is bright enough. Dim lights can cause blurry pictures.
Poor Alignment
Poor alignment can ruin the holographic effect. Make sure the projector is placed straight. Also, check the mirror angles. They should reflect light perfectly. Adjust them if needed. Use a level tool if you have one. Test your setup with a sample image. See if it looks centered. Small tweaks can make a big difference.
Frequently Asked Questions
What Materials Are Needed For A Homemade Holographic Projector?
To make a holographic projector, you’ll need a CD case, a knife, tape, and a smartphone. The CD case serves as the projection medium. The smartphone will be the display source. Ensure you carefully handle the knife while cutting the CD case into the required shapes.
How Does A Holographic Projector Work?
A holographic projector works by reflecting light from a display source onto a transparent surface. This creates a 3D effect. The transparent surface, usually a pyramid shape, refracts the light. This allows viewers to see the holographic image as if it’s floating in space.
Can I Use Any Smartphone For The Projector?
Yes, most smartphones are compatible with a holographic projector. The key requirement is a clear, bright screen. Ensure your phone’s display is large enough to view the holographic images clearly. Adjust brightness settings to enhance the holographic effect.
Is Making A Holographic Projector Safe?
Yes, making a holographic projector is generally safe if you follow instructions. Handle sharp objects carefully, especially when cutting materials. Ensure you’re in a well-lit area to avoid accidents. Always supervise children if they’re involved in the process.
Conclusion
Creating a holographic projector at home is exciting and rewarding. Simple materials transform into a window to the future. Follow clear steps for impressive results. Gather your friends and family to showcase your creation. A fun project for everyone. No need for expensive equipment.
Just creativity and patience. Experiment and explore new holographic designs. Share your experiences with others. Inspire them to build their own. Enjoy the magic of holograms in your living room. Keep innovating and learning. Your journey into holograms has just begun.

Everett Ashford is an electrical engineer and expert in electronics reviews, tips, and troubleshooting. Specializing in audio and sound devices, including earbuds, AirPods, and headphones, he brings in-depth knowledge and practical advice to help consumers make informed decisions.