How to Remove Swappable Popsocket Top: Step-by-Step Guide
Do you love the convenience and style of your swappable PopSocket but feel stumped when it comes to removing the top? You’re not alone.
Many people find themselves puzzled by this seemingly simple task. But worry not, because you’re about to uncover the easiest way to do it without a hitch. Imagine the satisfaction of effortlessly swapping out your PopSocket tops to match your mood, outfit, or even the season.
By reading on, you’ll discover the step-by-step process that will make this task a breeze. Get ready to transform your phone accessory game with confidence and ease!
Tools Needed
To remove a swappable Popsocket top, some tools help. You need a flat tool like a butter knife. This helps lift the Popsocket. A clean cloth is good too. It keeps the Popsocket and phone clean. You may use a small screwdriver. It helps in tight spots. Some people use tweezers. These help in pulling gently. Make sure you have a safe place to keep the top. This stops it from getting lost.
Always work on a flat surface. It helps in easy removal. A tray can hold your tools. It keeps everything in one place. Gather these before starting. It makes the task simple.
Credit: www.4imprint.com
Preparation Steps
First, find a flat surface. This helps keep things steady. Gather your tools. You need a Popsocket and a clean cloth. Clean the Popsocket with the cloth. This removes dust. Inspect the Popsocket for any damage. If damaged, be careful. Make sure your hands are clean and dry. This prevents slipping. Place the Popsocket on the surface. Keep it facing up. Look at the sides of the Popsocket. Find the edges. These help in pulling the top.
Understand how it works. A Popsocket has two parts. The base and the top. The top is swappable. This means you can change it. Learn the locking system. This helps in removing the top. Feel the texture of the top. It should be smooth. Check for signs. They show how to remove the top. Read any instructions on the package. Follow them carefully.
Detaching The Popsocket Top
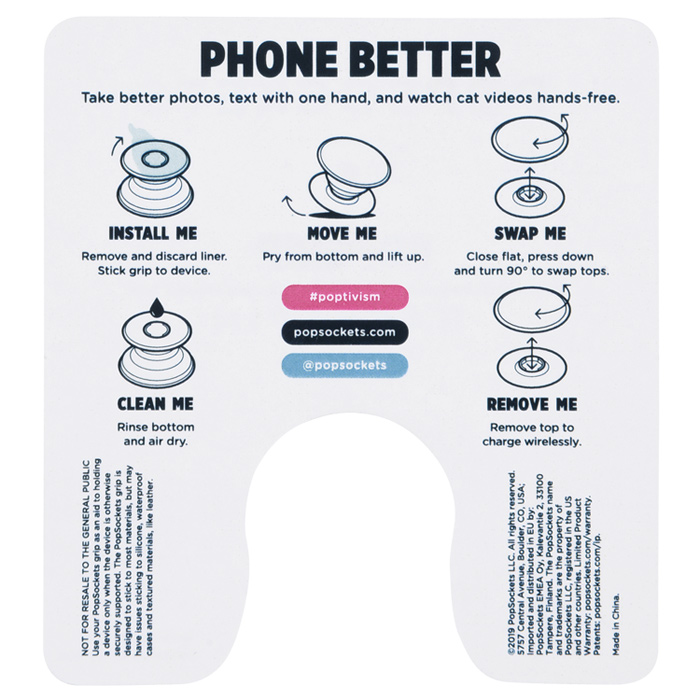
Identify the Popsocket Modelby checking its design. Different models have different tops. Some have a twist-off feature. Others might require a pull. Look for small arrows or marks. These guide you in the right direction. Always ensure your model supports swapping tops.
Twisting Techniqueis easy. Hold the base with one hand. Use the other to twist the top. Turn it counter-clockwise. It should pop off easily. Do not apply too much force. Gentle twisting is key. Repeat if it doesn’t work the first time.
Using Gentle Forcecan help. Sometimes, the top sticks. Gently wiggle it side to side. A little pressure can release it. Keep your grip firm but soft. Avoid pulling too hard. This prevents damage to the Popsocket.
Cleaning The Base
Start by peeling off the popsocket gently. Use your fingers to do this. If sticky residue remains, use rubbing alcohol. Apply it to a cotton ball. Rub the sticky area lightly. Be careful not to scratch the surface. This helps remove all sticky bits. Let it dry before using again.
Wet a cloth with warm water. Make sure it is not too wet. Wipe the base of the popsocket. This helps clear any dirt. Use a soft cloth to avoid scratches. Dry with a clean towel. Ensure it is completely dry. Now, the popsocket base is clean and ready.
Reattaching The Popsocket
Removing the swappable Popsocket top is simple. First, gently push the top until it clicks out. Then, reattach by aligning and snapping it back in place. Always ensure a secure connection for optimal grip.
Aligning The Top
Place the Popsocket top above its base. Make sure it sits straight. It should not wobble or tilt. Look for the grooves on the base. They help in guiding the top. Ensure each groove matches with the top’s slots.
Securing With A Twist
Hold the top firmly. Keep the base steady. Twist the top clockwise. It should click into place. You may hear a snap sound. This means it is secure. Test the connection by pulling gently. If it comes off, twist again. Check the alignment if needed.
Troubleshooting Common Issues
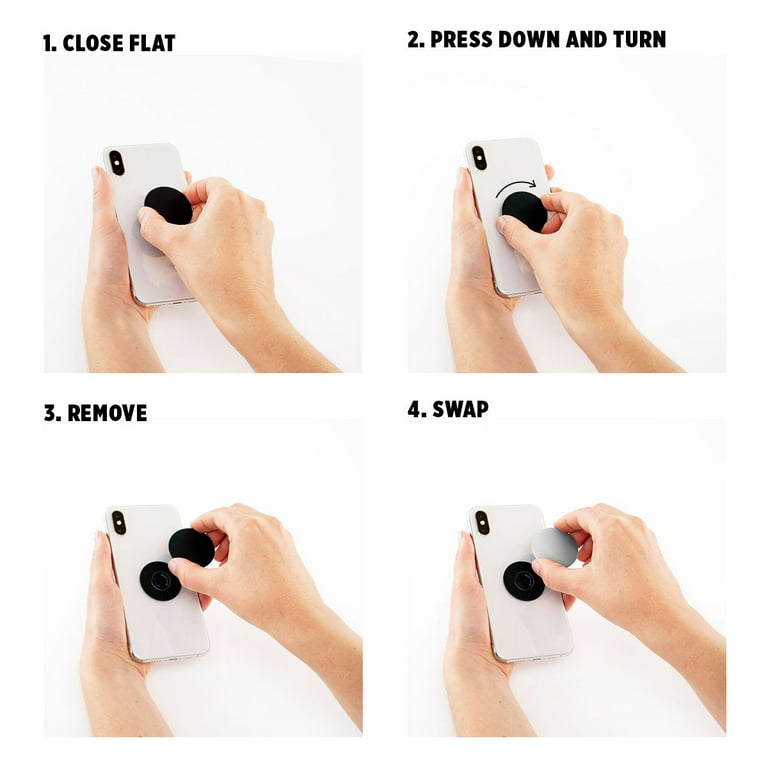
Removing a swappable Popsocket top is simple. Just press down and twist counterclockwise. It easily comes off, ready for a new design.
Stuck Popsocket Top
Sometimes, the Popsocket top gets stuck. Gently twist the top. Try to rotate it clockwise. If it does not move, try counter-clockwise. Do not force it. You might break it. Apply slight pressure while twisting. This helps in loosening. If still stuck, use a thin plastic card. Slide it under the top. Gently lift and twist again. Avoid sharp objects. They might damage the Popsocket. Patience is key. If it remains stuck, check for dirt. Clean the edges. Use a damp cloth. Make sure everything is dry before trying again.
Loose Connection
A loose connection can be annoying. First, check the base of your Popsocket. Ensure it’s securely attached. Press down the base with your thumb. This helps it stick better. If it is still loose, remove the top gently. Reattach it by lining up the notches. Press firmly until you hear a click. This ensures a secure fit. Sometimes, cleaning helps. Wipe down both parts. Remove dust or sticky residue. Reassemble once clean and dry. If it continues to wobble, consider a new base. Older bases might lose their stickiness.
Maintaining Your Popsocket
Easily remove your swappable Popsocket top by pushing down and twisting it 90 degrees. Lift gently to detach. Keep the base clean for secure reattachment.
Regular Cleaning
Keep your Popsocket clean. Dirt makes it sticky. Use a damp cloth for cleaning. Wipe gently to avoid damage. Dry with a soft towel. Do this weekly for best results. Clean helps it last longer. A clean Popsocket works better.
Avoiding Excessive Force
Use gentle hands when removing the top. Too much force can break it. Hold the base firmly. Twist the top slowly. Listen for a click sound. That means it’s ready to pop off. Be patient and careful. It protects your Popsocket.
Credit: www.walmart.com
Credit: www.reddit.com
Frequently Asked Questions
How Do I Remove A Popsocket Top?
To remove a swappable Popsocket top, flatten it first. Firmly press down and twist it counterclockwise. The top should easily detach from the base. Be gentle to avoid damaging the adhesive. Always ensure your Popsocket is clean and dry before reattaching or swapping tops.
Can I Reuse A Popsocket Top?
Yes, Popsocket tops are reusable. Simply remove the top and swap it with another design. Make sure the connection mechanism is clean to ensure a secure fit. Reusing allows you to personalize your phone without needing to buy a new base each time.
Will Removing The Top Damage My Popsocket?
No, removing the Popsocket top won’t damage it if done correctly. Use gentle pressure and twist counterclockwise. Avoid forcing it to prevent any breakage. Regularly removing and swapping tops is part of its design, ensuring versatility without compromising durability.
How Often Can I Swap Popsocket Tops?
You can swap Popsocket tops as often as you like. The swappable design is made for frequent changes. Ensure the mechanism is clean for a secure fit every time. Regular swapping allows you to match your style or mood without hassle.
Conclusion
Removing a swappable Popsocket top is simple. First, grip the Popsocket base firmly. Next, twist the top gently. It should come off easily. Don’t use force; it might damage the base. Swap with a new design or color. Personalize your phone without hassle.
Remember, the process is quick and straightforward. Keep your Popsocket collection fresh and fun. Try different styles to match your mood. Follow the steps for a secure fit. Enjoy the ease of customization. Happy swapping!

Finnian Delaney is a seasoned writer and editor specializing in technology and electronics. At ElectroDoz, he covers a wide range of topics, with a focus on MacBooks, laptops, fitness trackers, keyboards, and computer hardware. With a knack for making complex tech accessible, Finnian helps readers stay informed and confident when choosing their next device or upgrade.