How to Make Pixel Art in Google Sheets: Easy Guide
Are you ready to unleash your creativity in a whole new way? Imagine turning Google Sheets, a tool you often use for spreadsheets and data management, into your canvas for pixel art masterpieces.
Yes, it’s possible! Creating pixel art in Google Sheets is not only fun but also surprisingly simple, offering a fresh twist to your creative outlets. This unique method allows you to craft vibrant digital artwork using the familiar grid format of Google Sheets, transforming ordinary cells into colorful pixels.
You don’t need any fancy software or extensive art skills—just your imagination and a few clicks. Dive into this article to discover step-by-step how you can start creating your very own pixel art right in Google Sheets. Uncover the secrets to bringing your ideas to life and watch your screen transform into a digital art gallery. Let’s get started on this exciting creative adventure!

Credit: www.youtube.com
Getting Started With Google Sheets
Creating pixel art in Google Sheets can be exciting and rewarding. This method offers a simple, accessible way to design without specialized software. The first step is getting started with Google Sheets. This tool is free and available to anyone with a Google account. Let’s explore how to set up and understand the basics.
Setting Up Your Workspace
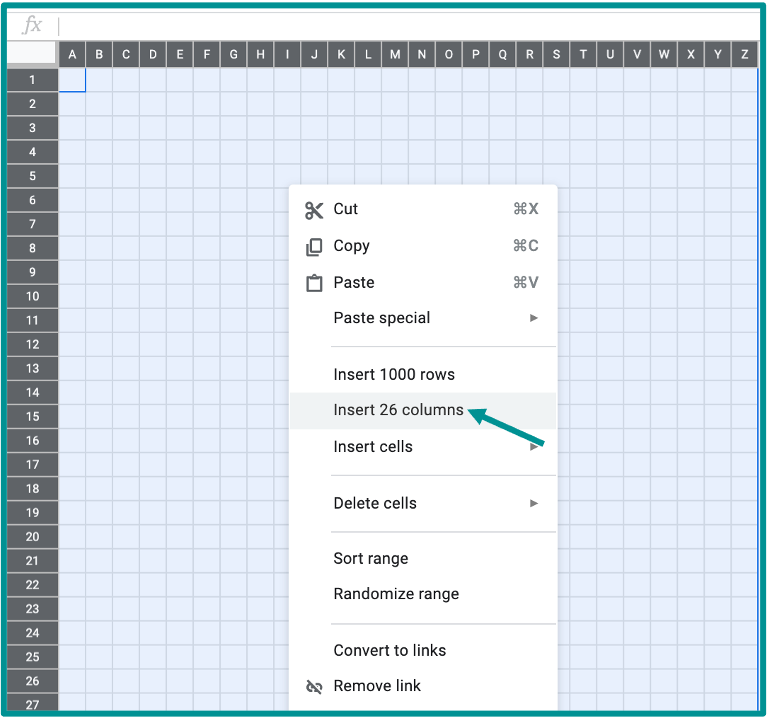
Begin by opening Google Sheets in your browser. Click on ‘Blank’ to create a new spreadsheet. Rename your file to something related to your pixel art project. This helps keep your work organized. Adjust the default cell size to create a better canvas. Click and drag to select all cells. Then, right-click and choose ‘Resize rows’ and ‘Resize columns’. Set both to the same pixel size, like 20. Now, your cells resemble a pixel grid.
Understanding Grid Layout
In pixel art, each cell is a pixel. The grid layout is your canvas. Think of each box as a square in your artwork. A larger grid allows for more detailed designs. Decide the dimensions of your art before beginning. For simple designs, start with a 16×16 grid. More complex images may need a 32×32 grid or larger. Use this layout to plan your art and ensure proportions are correct. This setup makes it easier to visualize your final piece.
Credit: www.vidnoz.com
Creating Your First Pixel Art
Discover the fun of creating pixel art using Google Sheets. Turn cells into pixels by adjusting their colors, crafting unique designs. It’s a simple way to start your pixel art journey with tools you already have.
Creating pixel art in Google Sheets is like discovering a hidden talent. You might wonder how a tool typically used for spreadsheets can be your canvas for creativity. The simplicity of Google Sheets allows you to focus on the essentials of pixel art without getting overwhelmed by complex software. Imagine turning a blank sheet into a colorful masterpiece with just a few clicks. Let’s dive into creating your first pixel art piece, step by step.
Choosing A Design
Start small with your design choice. Think of something simple like a heart, star, or smiley face. These shapes are easy to outline and fill, helping you understand the basics of pixel art. Sketch your idea on paper before transferring it to Google Sheets. This gives you a roadmap to follow as you fill in each cell, ensuring consistency and clarity. Once you have your design, visualize it as a grid. Each square in the grid represents a pixel in your artwork. You don’t need to be an artist to create something amazing; you just need the right mindset and a bit of patience.
Selecting Color Palette
Choosing colors for your pixel art is like picking spices for a dish. It can make or break your creation. Stick to a limited palette to maintain simplicity and focus. Consider using shades of a single color or complementary colors for contrast. This approach helps highlight your design and adds depth. Test your color choices by filling a few cells to see how they look together. Adjust as needed. This trial and error process is part of the fun and learning experience.
Using Fill Tool
The Fill Tool is your best friend in Google Sheets. It allows you to quickly color in cells to bring your design to life. Select the cell you want to fill, then choose your color from the toolbar. Experiment with different fill techniques. Try filling cells row by row or column by column. Notice how different approaches affect the look of your artwork. Remember, you can always undo and redo your actions. Don’t be afraid to play around with your design. Mistakes are part of the creative journey. What if you discover a new pattern or style that suits your taste better?
Advanced Techniques
Creating pixel art in Google Sheets can be a fun process. For those ready to dive deeper, advanced techniques can elevate your artwork. These methods add depth, motion, and complexity to your creations.
Layering And Shading
Layering adds depth to pixel art. Use different sheets for each layer. This technique helps in organizing complex designs. Shading brings your art to life. It creates a sense of light and shadow. Use varying shades of the same color. This adds a three-dimensional effect to your artwork. Experiment with gradients for smoother transitions.
Animating Pixel Art
Animating pixel art requires creativity and patience. Start by creating a sequence of frames. Each frame should show a slight change in the artwork. Use conditional formatting to display frames in sequence. This simulates movement in your art. Practice with simple animations first. Gradually move to more complex designs. This technique can make your pixel art dynamic and engaging.
Tips For Better Pixel Art
Creating pixel art in Google Sheets is a unique and enjoyable process. It blends creativity with the simplicity of spreadsheets. To enhance your pixel art skills, follow these tips. They can help improve your designs significantly.
Maintaining Consistency
Consistency is key in pixel art. Use a uniform grid size. This keeps your art neat and proportional. Choose a palette of colors that complement each other. Limit your palette to avoid overwhelming designs. Set a theme for your artwork. This keeps your style consistent throughout the piece.
Optimizing For Different Devices
Consider device compatibility when designing pixel art. Adjust grid sizes for mobile screens. This ensures your art looks good everywhere. Use scalable designs for different resolutions. Test your artwork on various devices. This helps you identify any adjustments needed. Ensure your pixel art remains clear and vibrant on all screens.
Sharing And Exporting
Creating pixel art in Google Sheets is a fun and unique way to express your creativity. But what happens after you’ve crafted your masterpiece? This section will guide you through the process of sharing and exporting your pixel art, allowing you to showcase your work to friends and family or use it in various projects. Let’s dive into the steps that will help you preserve and share your artwork effortlessly.
Saving Your Artwork
Once you’ve finished your pixel art, it’s crucial to save your work properly. Google Sheets automatically saves changes, but you might want a more permanent version. Consider downloading your sheet as a PDF or Excel file to ensure you have a backup. This way, you can access it offline or share it through email.
Another option is taking a screenshot of your pixel art. This is especially useful if you want to post your creation on social media or a blog. Remember to crop the image to focus solely on the art piece, eliminating any unnecessary grid lines.
Sharing With Friends
Sharing your pixel art can be as simple as sending a link. Google Sheets allows you to share your document with others, granting them view or edit permissions. You can even invite friends to collaborate on new designs, turning art creation into a fun group activity.
Want to surprise a friend with your art? Export it as an image and send it directly through messaging apps. Consider adding a personal note about your creative process or what inspired the design. This personal touch can make the sharing experience more meaningful.
Have you ever thought about using your pixel art as a gift? You could print it on a mug or a t-shirt. Such thoughtful gifts can make your artwork come to life and be appreciated in everyday items.
What other creative ways can you think of to share your pixel art? The possibilities are endless, so don’t hesitate to explore them. Sharing your art is not just about showing off your skills; it’s about connecting with others through creativity.
Credit: lindsaybowden.com
Frequently Asked Questions
How To Start Pixel Art In Google Sheets?
To start pixel art in Google Sheets, first open a new sheet. Adjust the cell size to create a grid. Choose the colors by using fill color options. Begin designing by filling cells with colors to form your desired image.
Use the undo feature to correct mistakes easily.
Can I Import Pixel Art Designs?
Yes, you can import pixel art designs into Google Sheets. Use the “Insert” option to upload images, but for manual pixel art creation, replicate the design using the grid and color fill options. This helps in customizing and enhancing your designs directly in the spreadsheet.
How Do I Resize Cells For Pixel Art?
To resize cells for pixel art, select the cells you want to adjust. Right-click and choose “Resize Row” or “Resize Column. ” Set the dimensions to make them square, typically 20×20 pixels. This creates a uniform grid ideal for pixel art creation.
Are There Templates For Pixel Art?
Google Sheets doesn’t offer specific pixel art templates. However, you can create your own template by setting a grid and choosing colors. Save your design as a template for future projects. This approach provides flexibility and personalization for your pixel art endeavors.
Conclusion
Creating pixel art in Google Sheets is fun and simple. You can unleash your creativity with this unique method. Experiment with colors and shapes to design your masterpiece. Google Sheets offers an accessible platform for all skill levels. Share your artwork with friends or use it for projects.
Enjoy the process and watch your ideas come alive. This digital canvas is perfect for beginners and pros alike. Keep practicing to improve your skills. Happy pixel art creating!

Marlowe Quinn is a technology writer at ElectroDoz, with expertise in smartphones, chargers, power banks, phone cases, selfie sticks, and other mobile accessories. Known for breaking down specs and features into easy-to-understand insights, Marlowe helps readers find the right gadgets to stay connected and powered up in their daily lives.